Title

Title

Wednesday, January 16, 2013

Sadly, you won't find it on my mantel

So you may have recently seen a photo on the social sites from Scott Meek (yes, THE Scott Meek) about how one of his customers displays his try plane.  It is a very beautiful chunk of maple.  Oh, you haven't seen it?  You need to see it.  Go find it real quick.  You owe it to yourself.  Or at least go to Scott's website and check out one of his other beauties.  I'll wait here.

Are you back?  Ya, told ya!  Aren't they beautiful?

This blog post is also about a plane.  But you can basically call this plane the ugly step sister of one of Scott's planes.  Why?  Because Scott Meek did not make this plane.  I did.  With Scott's expertise and guidance, of course.  No, Scott is not my neighbor, or my new bestest bestest friend...even though I have thought to ask (Scott, if you are reading, the offer is open).  He is now teaching a class to build a smoother, in your own shop, with your own tools!  BRILLIANT!

Ok, so he doesn't actually come to your shop...no, no, you see...Scott's class takes place LIVE online through the glorious magic of Google +.  All that is required is that you have a pc, laptop or other device to connect, at the agreed upon appropriate time, with Scott and 3 or 4 other students in a "hangout."  I used my new iPad to connect and it worked fantabulously well!  You don't need a webcam, although it is recommended, but you do need a microphone and speakers to participate in the class.  Matt Vanderlist, you can turn off the webcam and wear your jammies if you so desire.  Oh, and you need tools and your own wood which Scott has described with great detail of what you need on his site.

So without further delay, here is my plane.  Again, it is a smoother.  It isn't all that pretty.  It can't even really be compared to Mr. Meek's bad work (as if there IS such a thing).  But with a little therapy, I will be ok with that.  I'll get over it.  But my plane works FANTASTICALLY well!  I owe all of that to Scott.  I just finished it tonight, so I don't have many miles on it.  But so far, I am so pleased!  I am in love with this plane.  I may take her with me to bed tonight, I'll remove the blade of course.

Here it is all glued up and ready to open the mouth.  The body is quarter-sawn Sycamore and the crosspin and wedge are Bocote.  The blade is a Hock!  (insert Borat voice) It's a very NICE!!


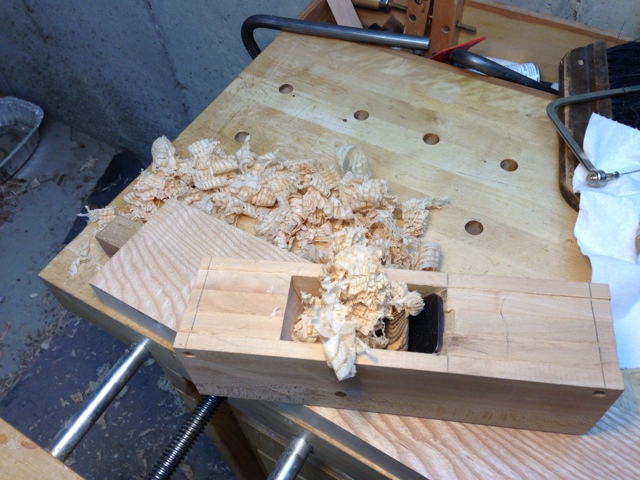
The mouth is opened up with a file and a wee bit of light is coming through.  Let's see how it works.

Eureka!  There are some nice fluffy shavings goin on up in here!

Time for some shaping.  Thanks to my friend, @tjhenrik, I got a good start with his bandsaw.  Note to self:  I really need a bandsaw!  I also used the draw knife quite a bit for the rough shaping.  It helped remove a lot of material quickly.  But mostly I used my rasp.

Not quite the shape I want, but it is a start and it was late and I needed to go to bed.

After a couple more hours of shaping tonight, I think I have reached the shape that I want.  I will be honest when I say I did a lot of shaping by feel rather than by eye.  I wanted it to feel good and to fit my big meaty paws really well.  This is very close.  I may tweak it a bit later, but I feel I need to put some miles on it to figure out, if any, the changes I need to make.

Ok, so you may need to wear some beer goggles to see her the way I do, but I would take her home from the bar at 3 in the morning!  After shaping, I sanded with 80 grit, quickly ran some 150 grit over her and slapped 3 very quick coats of garnet shellac on her.  Once dry, I rubbed down the body (not inside the blade compartment) and the sole of the plane with some Johnson's paste wax.  I wanted it to be really grippy, and I succeeded.  It feels like it is stuck to my hands when in use.

I like the Bocote.

Ya, baby got back and I cannot lie!  But I like it.  It fits my hand well.


An action shot:  I got the most figured piece of wood in my shop.  No problem.  Tear out?  Are you kidding me?  Forget about it!

I LOVE HER!


So there she is, my new favorite tool.  Thanks so much to Scott for having this class.  I am so glad I did it!  It wasn't nearly as difficult as I thought it would be.  As with anything, it takes some time, patience and tools.  Go check out Scott's site for the class schedule and more information.  It really is worth the time and investment.  Even if you have never used or made a wood body hand plane.  I had never even used a woody before this (insert your own joke here).  Great experience.  There isn't much better than making and using your own tools!

Wednesday, January 9, 2013

Much needed therapy!

I have been doing several mundane tasks lately, finishing some overdue projects. Lots of sanding, glueing, sanding, finishing, sanding...did I mention sanding? Anyway today I had, what my good friend Annie would say, a "shapoopy" day at work. I came home from work, changed my clothes, ate some quick dinner and headed down to the dungeon to get some more sanding done.

I got started and about 13 seconds later I had all I could take and put it away. I needed a quick project...scratch that...I needed to beat the ever loving $h!t outta something, and fast!

I have wanted to make a new mallet for a while. I found a thick piece of scrap maple and got after it. I am making this mallet with a "dovetailed" handle through the head. Here is my much needed therapy. I pounded the hell out of that chunk of wood making the tapered through mortise. It took a good long while and a lot of brute force, and that my friends is what I call good cheap therapy. I feel so much better....lol.

No pics, sorry. It's just a standard laminated maple joiners mallet. Only thing special about it is that I am making it also a dead blow by incorporating some 1 oz bird shot in the head. I saw something similar online at some point and filed it for one of those projects I wanted to try. It may turn out not all that useful, but hey, at least I got my therapy!

Saturday, January 5, 2013

School box and some MWA gratitude

First off, I want to give a HUGE thanks to the guys at MWA for the mention of this blog on their latest podcast.  I was listening to the podcast while piddling around in my shop.  When I heard my name mentioned, I froze.  I literally couldn't move or think or speak for at least 10 seconds.  What a surprise!  I am thrilled to death that these guys gave me the spotlight for a minute of their show.  I met Tom and Dyami at WIA this year and they are both what I consider good people!  Echoing my last post a little, the woodworking community are just the best people I have found.  Again, thanks so much guys!  You made my day!  Oh and Dyami, to answer your question, I live in a suburb north of Indianapolis, IN.  :)

So now that the holidays are over and settling back into the groove, I am going to focus on finishing a few projects that I started during the last half of the year.  For one reason or other, these projects just didn't get finished.  Now that I am in between projects, I will be working on finishing these up.  This school box is the first in line.

So, I am a big fan of Lost Art Press.  I have only bought a few books and only read one from cover to cover, (ATC) but I just like the idea of supporting the "little guy" and the craft in general.  I received recommendations from several people to buy the book "The Joiner and Cabinet Maker."  It looked like a decent read, so I took a chance and bought it.  Well, I am a little ashamed to say that I still have not read it, at least not all of it.  But I did get about halfway through it and I am picking it back up right now.  I hope to finish it within the next few weeks.

Anywho.....the point is that I read about this little school box in the book and I was intrigued.  It sounded like a neat little project.  I had been thinking about doing some boxes for a while and this fit the bill.

Now, I am also a HUGE fan of the Marc Adams School of Woodworking down in Franklin IN....for a couple of reasons.  One, it is such an awesome facility.  Two,  Marc and their staff are top notch.  Three....well hell, it is practically in my backyard.  Well for the past couple years I have been taking a class or two down there and it just so happens that Chris Schwarz was going to teach a class to build this school box and a few other little shop appliances.  I was all over that like stink on....well you get the idea.

So the class was in September and I had a great time!  It was a week long and as always, just a lot of fun.  A lot was learned, and memories were made.  So without further adieu...here are some pics of the finished school box.  I apologize for the photo quality.  I promise I will learn how to take better photos some time this year.  But for now, my iPad does the best job.  I didn't take any photos of the build during the class, for that I also offer apologies.

The wood is cherry.  It looks like it has a large dark streak and it does, but it is because the surface is a little rotted. I did not know this when I bought the cherry, I just thought it looked really cool.  If I had known it would have given me such problems, I would not have used this piece of cherry.  I couldn't even sand the sides to get it smooth enough.  So if you ever see it in person, some areas look a little rough.  I did all I could to smooth it, but I was just making more problems than I was fixing.  So I just quit trying to "polish the turd".  But all in all, it doesn't really detract anything from the box.  I just have those awful memories....lol.

The finish is Garnet Shellac, rubbed out and waxed with just some paste wax.  The hardware is hand forged iron from Horton Brass.

The inside is left unfinished.  Never mind all of my oily finger prints there, they will dry eventually, hopefully...haha

Again, hand forged iron butterfly hinges.  I really like the looks of these.

It was a fun project.  I hope you build one and show your results!  Now I have to get ready for date night with the wifey.  I think we are gonna see "Django Unchained."  I am excited!  :)

Cheers!